Open topic with navigation
Create Worship Volunteer Jobs and Schedules
Next, it's time to focus on the volunteers you will need to work during service times. The first step is to create some jobs for the volunteers. This is the step where you will define all the jobs that occur during your worship services. For example, lead ushers, lead greeters, ushers, greeters, hospitality crew, and so on.
Once the jobs have been defined, you will create volunteer schedules. In this step you can define the frequency your volunteers serve.
Step 1: Create volunteer jobs
To create volunteer jobs:
- Click Ministry > Volunteers > Jobs. The Job Selection screen appears. Make sure your church wide services ministry is displayed ain the ministry box at the top of the page.
- Click the new (plus) button in the upper-right corner of the Job Selection grid. The Manage jobs form appears.
- Type Usher in the Job name field.
- Type a description for the job in the Job Description field on the right side of the screen.
- Click Add Job. The Job Summary appears.
- Optionally, add any restrictions that apply to this job by clicking the Add/Edit Job Restrictions link in the Job Restrictions area. This area allows you to define what criteria a volunteer must posses to do this job. For example, maybe it's necessary for your ushers to be church members or be a particular age or gender.
- Repeat steps 1-6, this time add the Greeter job.
Step 2: Create volunteer schedules
By default, Fellowship One creates a Base Schedule for your volunteers that mimics the schedules you added for this activity (see Create a Worship Service Activity for details). Since there are several schedules for this activity, you cannot assume that volunteers can serve every schedule, every time the activity occurs. This is your chance to create some schedules to provide flexibility for your volunteers that will also give you accurate reporting.
Fellowship One allows you to create as many different kinds of volunteer schedules as you would like to create. For example, you may have volunteers that work alternating weekends (for example, 1st and 3rd Sundays). Or you may have volunteers who work only one weekend per month. Create the volunteer schedules you need to meet everyone's needs.
In this example, you will add Odd and Even Month schedules. Check out the children's example for additional scheduling ideas.
To add volunteer schedules:
- Click Ministry > Volunteers > Schedules. The Add/Edit Staff Schedules form appears. Make sure the worship services activity appears at the top of the form. If it does not, select the worship services activity from the Show activity drop-down list in the Staffing Schedules grid at the bottom of the page.
- Type Odd Months in the Schedule name field.
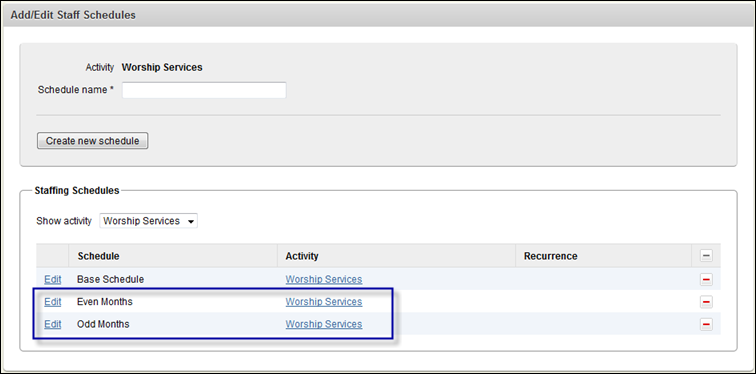
- Click Create new schedule. The Odd Months schedule appears in the Staffing Schedules grid at the bottom of the page.
- Type Even Months in the Schedule name field.
- Click Create new schedule. The Even Months schedule appears in the Staffing Schedules grid at the bottom of the page.
 Your screen should look like this

- Click Edit beside the Odd Months schedule. The schedule appears in the form at the top of the screen
- Click the Recurrence button. The Staffing Recurrence dialog box will open.
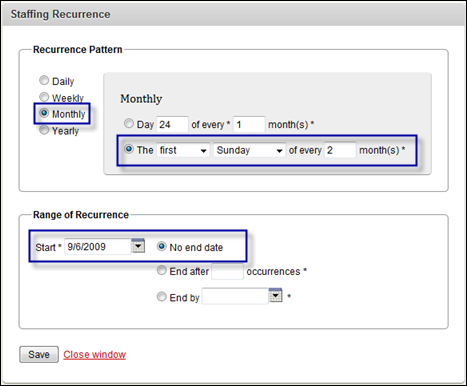
- In the Recurrence Pattern box, select the Monthly option and then select The first Sunday of every 2 months(s) option.
 Your screen should look like this

- In the Range of Recurrence box, type a Start date beginning with the first Sunday of an odd month. For example, 9/6/2009.
- Select the No end date option.
- Click Save.
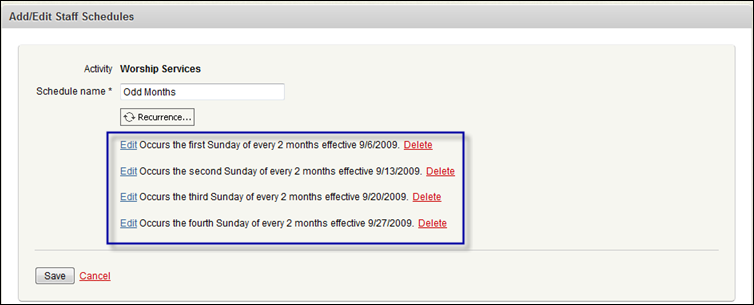
- Repeat steps 7-11. This time, select The second Sunday of every 2 month(s) and your start date will begin with the second Sunday of the odd month. For example, 9/13/2009.
- Repeat until you have added recurrences for all 4 Sundays for the month you select.
 Your screen should look like this

- Click Save.
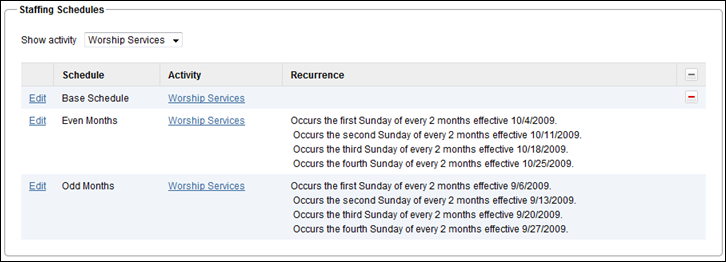
- Repeat steps 6-14 for the Even Months schedule.
 Your screen should look like this

Go to next step
![]() Your screen should look like this
Your screen should look like this![]() Your screen should look like this
Your screen should look like this![]() Your screen should look like this
Your screen should look like this![]() Your screen should look like this
Your screen should look like this![]() Your screen should look like this
Your screen should look like this![]() Your screen should look like this
Your screen should look like this![]() Your screen should look like this
Your screen should look like this![]() Your screen should look like this
Your screen should look like this